Island Surface Defect Formation in TiN.
Introduction.
This tutorial demonstrates the process of creating material with island on the surface of TiN(001) based on the work presented in the following manuscript.
Manuscript
D. G. Sangiovanni, A. B. Mei, D. Edström, L. Hultman, V. Chirita, I. Petrov, and J. E. Greene, "Effects of surface vibrations on interlayer mass transport: Ab initio molecular dynamics investigation of Ti adatom descent pathways and rates from TiN/TiN(001) islands", Physical Review B, 2018. DOI: 10.1103/PhysRevB.97.035406. 1
We use the Materials Designer to create a slab of TiN, identify the cartesian coordinates for an island on the surface, and build it.
We will focus on creating graphene-nitrogen structures from FIG. 2. Specifically, the material from FIG. 2. a) of the paper:

1. Create and preview TiN Slab.
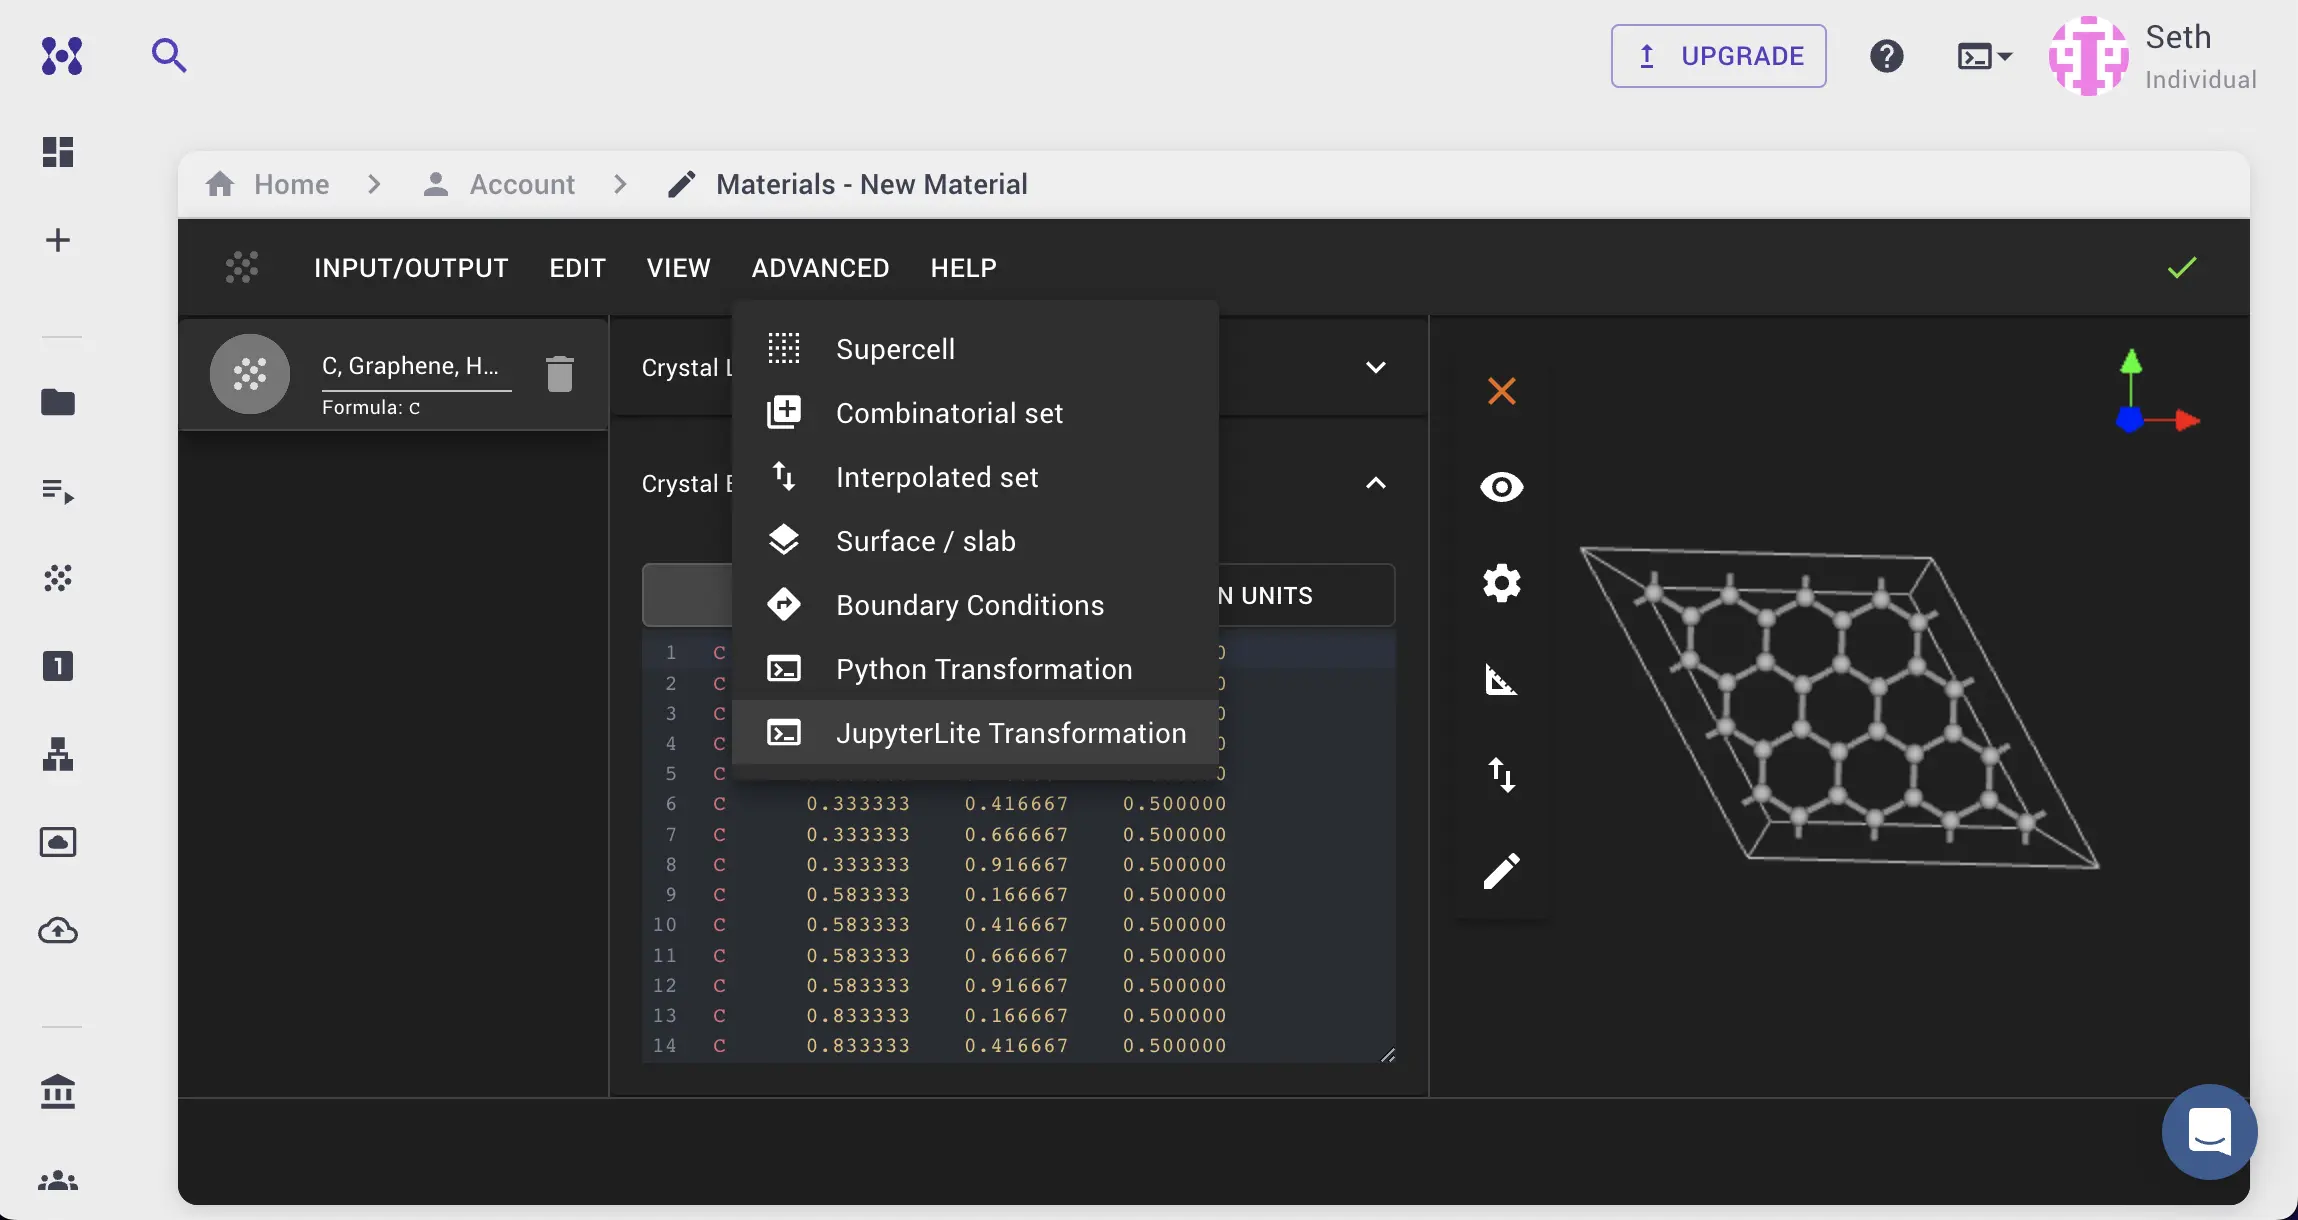
First, we navigate to Materials Designer and import the graphene material from the Standata.

Then we will use the JupyterLite environment to create a TiN slab.
1.1. Launch JupyterLite Session.
Select the "Advanced > JupyterLite Transformation" menu item to launch the JupyterLite environment.

1.2. Open and modify the notebook.
Next, edit create_slab.ipynb notebook to modify the parameters by adding the following content to the "1.1. Set up slab parameters" cell in the notebook:
# Enable interactive selection of terminations via UI prompt
IS_TERMINATIONS_SELECTION_INTERACTIVE = False

MILLER_INDICES = (0, 0, 1)
THICKNESS = 3  # in atomic layers
VACUUM = 10.0  # in angstroms
XY_SUPERCELL_MATRIX = [[10, 0], [0, 10]]
USE_ORTHOGONAL_Z = True
USE_CONVENTIONAL_CELL = True

# Index of the termination pair to be selected
TERMINATION_INDEX = 0
1.3. Run the Notebook.
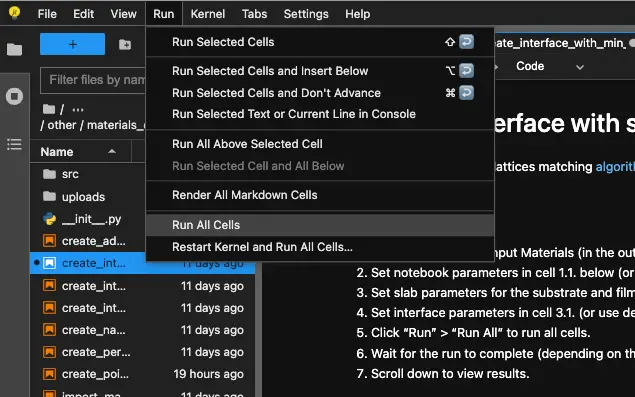
Run the notebook by clicking Run > Run All in the top menu to run cells and wait for the results to appear.

1.4. Analyze the Results.
After running the notebook, the user will be able to visualize the created TiN slab.

We don't need to save the material at this point, as we will recreate the slab with island on the surface in the next notebook. This step is needed to identify the coordinates of the island vertices.
2. Identifying the Island vertices coordinates.
We are creating an island defect that covers an area of 4.5x4.5 unit cells (which corresponds to 9x9 atoms). This island will be placed inside a 10x10 supercell (20x20 atoms).
To position the island correctly, we need to select coordinates that are 0.45 crystal units apart along both lattice directions (a and b), ensuring the island is centered.
The initial coordinates for this are [0.0, 0.0] and [0.45, 0.45].
To ensure the island starts from the Ti atom on the edge in the next layer, we will slightly adjust the coordinates:
- Shift the left border by
0.05(1/20 of the distance between atoms), - Shift the top border by
-0.05(also 1/20 of the atom spacing).
For the z-axis, the first vertex will have a z-component of 0 (starting at the base of the supercell), and the second vertex will have a z-component of 1 (reaching the top of the supercell), ensuring the island spans the entire z-direction.
The coordinates after these adjustments are: [0.05, 0.0, 0] and [0.45, 0.4, 1].
Finally, to move the island to the center of the supercell, add 2 unit cells (2/10 of the supercell size) to both island vertex coordinates.
The final centered coordinates of the island are: [0.25, 0.2, 0] and [0.65, 0.6, 1].
These coordinates will be used in the next step to create the island on the surface.
3. Create Island on the Surface.
3.1. Open create_point_defect.ipynb notebook.
Close the current notebook. Introduction notebook should be open by default.
Find create_island_defect.ipynb in the list of notebooks and double-click open it.
3.2. Modify the notebook.
Next, edit create_island_defect.ipynb notebook to modify the parameters by adding a list of defect configuration objects containing the cartesian coordinates of the island vertices.
With the same TiN material selected in the materials input and coordinates for the island vertices from the previous step, the user can create the island on the surface.
Notice, that we did not create the slab yet, so it is necessary to provide slab parameters in this notebook.
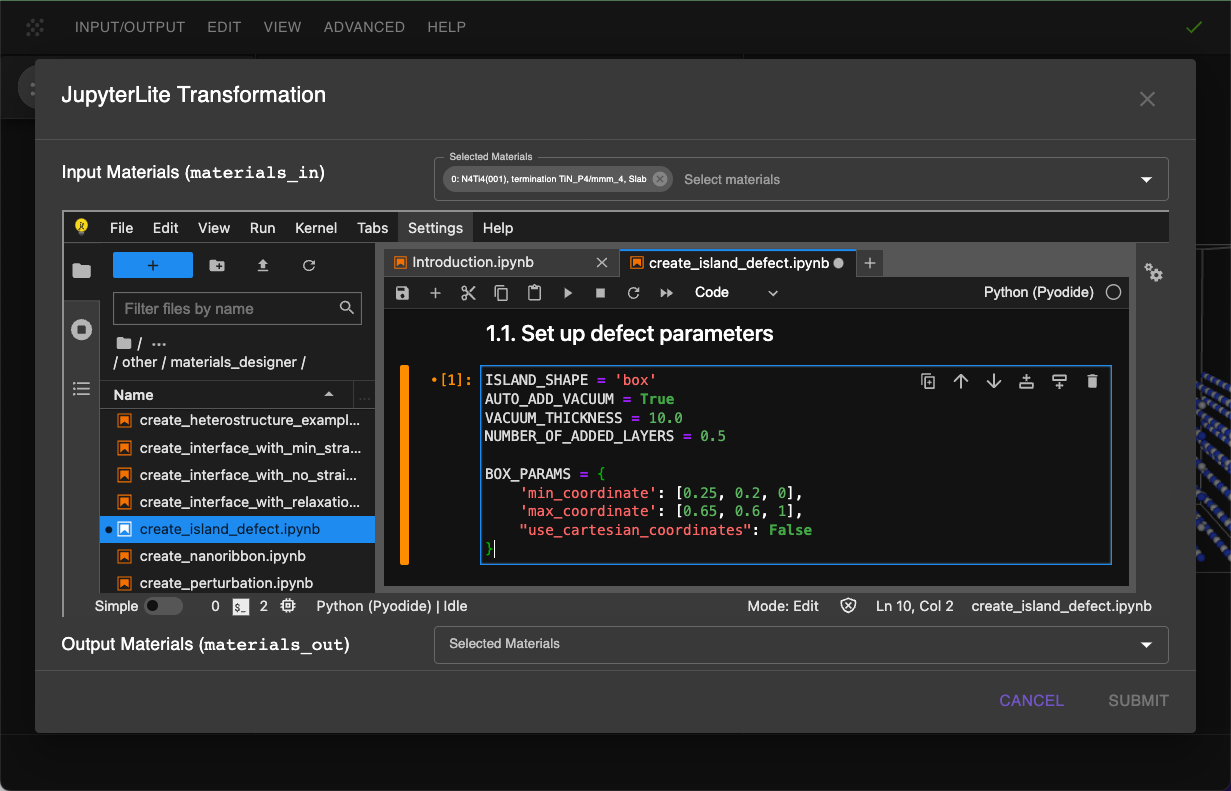
Copy the below content and edit the "1.1. Set up defect parameters" cell in the notebook as follows:
ISLAND_SHAPE = 'box'
AUTO_ADD_VACUUM = True
VACUUM_THICKNESS = 10.0
NUMBER_OF_ADDED_LAYERS = 0.5

BOX_PARAMETERS = {
    'min_coordinate': [0.25, 0.2, 0],
    'max_coordinate': [0.65, 0.6, 1],
    "use_cartesian_coordinates": False
}

DEFAULT_SLAB_PARAMETERS = {
    "miller_indices": (0,0,1),
    "thickness": 3,
    "vacuum": 0.0,
    "use_orthogonal_z": True,
    "xy_supercell_matrix": [[10, 0], [0, 10]]
}
Here's the visual of the updated content:

4. Run the Notebook.
Run the notebook by clicking Run > Run All in the top menu to run cells and wait for the results to appear.

5. Analyze the Results.
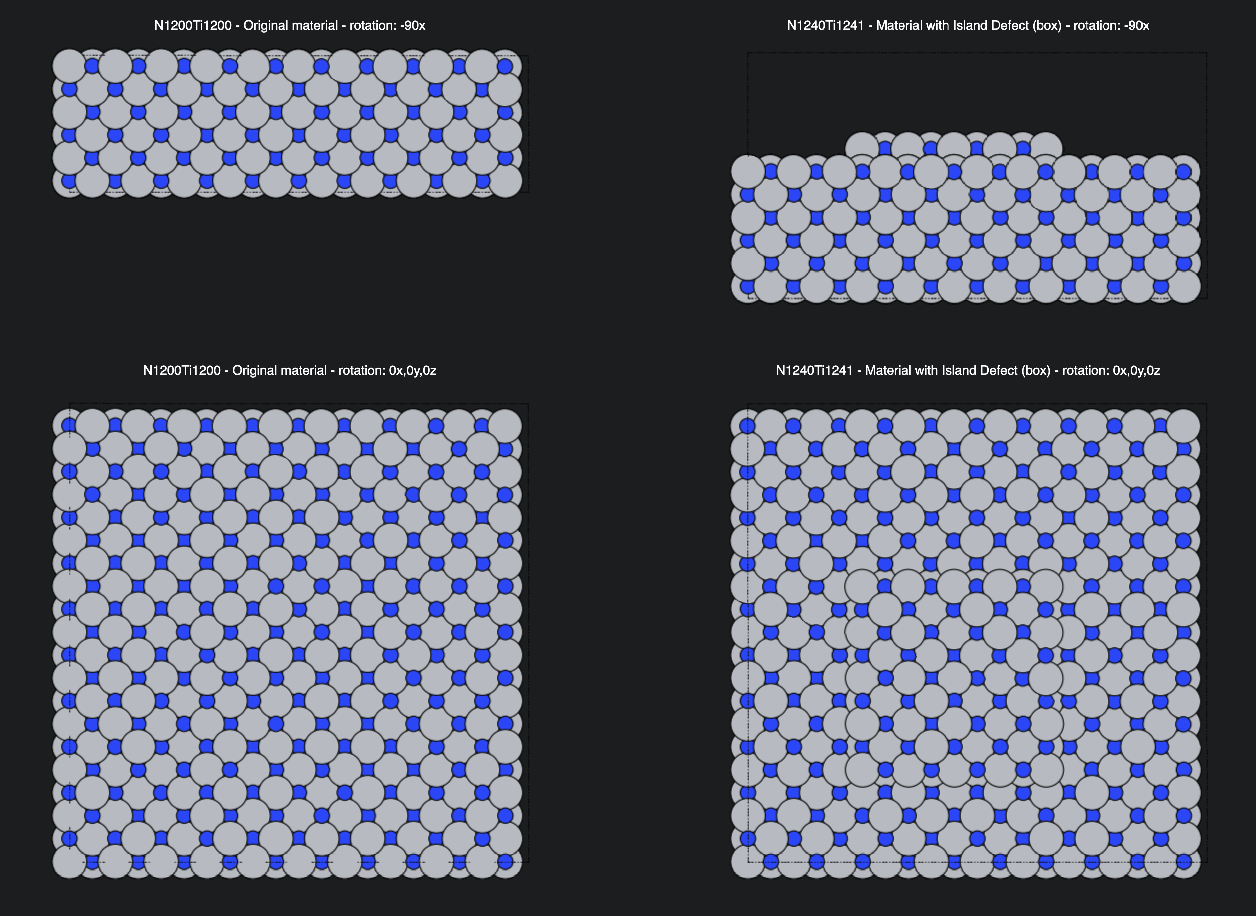
After running the notebook, the user will be able to visualize the created material with the island on the surface.

6. Pass the Material to Materials Designer.
The user can pass the resulting material to the current Materials Designer environment and save it.
Or the user can save or download the material in Material JSON format or POSCAR format.
Interactive JupyterLite Notebook.
The following JupyterLite notebook demonstrates the process of creating material with island. Select "Run" > "Run All Cells".
References.
-
D. G. Sangiovanni, A. B. Mei, D. Edström, L. Hultman, V. Chirita, I. Petrov, and J. E. Greene. Effects of surface vibrations on interlayer mass transport: ab initio molecular dynamics investigation of ti adatom descent pathways and rates from tin/tin(001) islands. Physical Review B, 97:035406, 2018. URL: https://link.aps.org/doi/10.1103/PhysRevB.97.035406. ↩